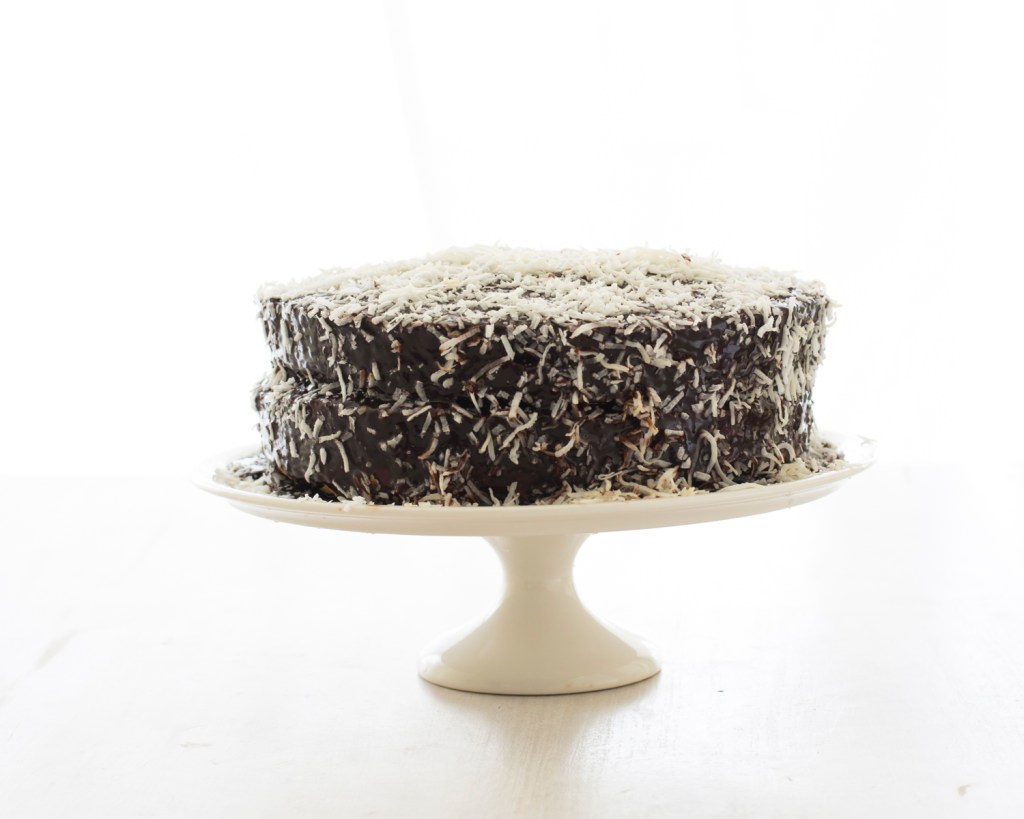
This cake is a stunning crowd pleaser – it is rich, intensely chocolatey, and decadent. Better still, it is very easy to make! It is very large so best for feeding a crowd however if you want to make a more modest and sensibly sized cake then simply halve the recipe.
I will confess that I did not perfect the presentation with this cake! I had to rush it a bit and decorate it while to chocolate coating was still ever-so-slightly warm and it slumped a bit. The result was a less than perfect looking cake but when it tastes this good no one cares!
Enjoy!
Deluxe Lamington Cake
Two coconut cakes recipe below
Chocolate coating recipe below
Shredded coconut to decorate
Coconut Cakes
This recipe makes two 20cm (8inch) cakes.
250g (2 cups) self-raising flour
185g (2 cups) fine desiccated coconut
220g (1 cup) caster (superfine) sugar
1 tsp salt
200g (1 cup) dark chocolate chips
500ml (2 cups) coconut milk
2 tsp vanilla extract
Preheat the oven to 180C (350F). Line the base of two 20cm (8 inch) springform cake tins.
Place the first five ingredients into a bowl and mix everything together. Add the coconut milk and vanilla and stir until just combined.
Divide the batter evently between the two cake tins. Bake until golden brown on top and the cake is cooked through (test with a skewer).
Allow the cakes to cool thoroughly before decorating.
Chocolate Coating
15g cocoa
150g caster sugar
100ml water
150g dark chocolate chips
Place the cocoa, caster sugar, and water in a saucepan and heat until it just starts to simmer. Remove from the heat, add the chocolate chips, and stir until smooth. Set aside to cool.
To Assemble
Make sure the cake and chocolate coating have cooled. It is important that the cake and chocolate coating are allowed to cool completely before decorating the cake! The chocolate coating will thicken as it cools; if the chocolate coating is poured over the cake while warm it will run off and pool at the bottom of the serving plate. I know this because that it exactly what I did. If you look closely at the picture you can see this. I was in a rush the day I made this; please learn from my mistake!
Place one cake on a plate stand (or cake plate). Spoon over about one third of the chocolate coating; spread to coat the top of the cake and the sides.
Place the second cake on top. Spoon over the remaining chocolate coating; spread to coat the top of the cake and the sides.
Sprinkle the shredded coconut over the top and press it into the sides of the cake.
Do you want to make regular lamingtons instead of a cake?
The above recipe may be used to make regular square-shaped lamingtons. Here are a few tips:
* Reduce the coconut cake recipe by half and bake in a lamington pan (measures approx. 20 x 30cm); it only takes about 12-15 minutes to cook.
* The chocolate chips make it hard to cut into even square shapes so if presentation is important to you then omit the chocolate chips.
* I like a jam filling (either raspberry or strawberry). When the cake is cooked and cooled cut into half (down the middle). Spread jam on one side and then place the other half on top; press gently. Cut evenly to make twelve cake sandwiches.


* Use a half quantity of the chocolate coating recipe above. The chocolate coating will need to be slightly warm otherwise it will drag all the crumbs off the cut edges of the cake. Making lamingtons is a messy business – embrace it and good luck!


I never met a lamington before I moved to Australia but we’ve become close friends. I’ve never made any as the bakery on the corner makes fantastic ones. The cake idea sounds wonderful. I’m eager to try that.
Thanks Maureen!
So glad to have the recipe for this stunner Stephanie! I think this might be Colin’s birthday cake this year. Lamington’s are very popular in NZ too, but the square ones are always served with a mound of whipped cream that has been piped into a deep diagonal cut, with a small dot of red jam adorning the cream. I can’t help thinking about sandwiching this cake together with cream and a swipe of jam, kind of like a sponge…
I almost added a cream filling! It would look stunning with cream in the middle but I didn’t because I really don’t like cream! I hope you do make it – I would love to see a photo!
The cake looks absolutely divine!